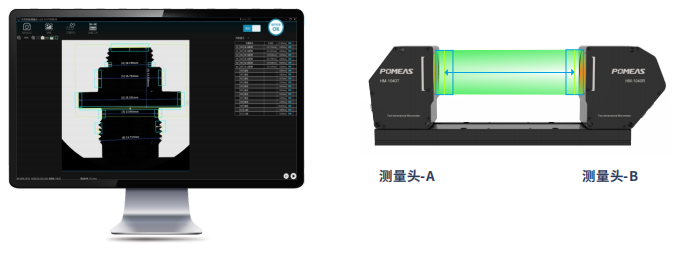
In industrial production, especially for large and precise workpieces such as motor cores, the accuracy and efficiency of OD measurement is a key component to ensure product quality and production schedule. Traditional measurement methods often face challenges such as limited field of view and complexity of operation when dealing with large workpieces. However, the development of modern technology has brought us an innovative solution - an in-line image measuring instrument with dual measuring heads, a technological innovation that greatly enhances the flexibility and efficiency of measurement.


Boundless field of vision and easy handling of large workpieces
The in-line image measuring instrument effectively solves the problem of insufficient field of view coverage by integrating a dual measuring head design. Even in the face of large-sized motor cores, full coverage of the measurement area can be ensured without the need to frequently move the workpiece or adjust the position of the measuring instrument, thus greatly improving the convenience and stability of the measurement.
Cross-measuring head setting tool for flexibility
What's more, the dual measuring head system supports the function of setting tools across measuring heads. This means that users can flexibly configure and adjust the parameters and tools of both measuring heads to suit different shapes, sizes and measurement accuracy requirements. This high degree of flexibility enables the in-line image measuring instrument to perform more diverse measurement tasks, including the measurement of complex contours and special positions.
Tool combinations that multiply functionality
The dual measuring heads are not only powerful independently of each other, but can also be used in combination with their respective set of tools. This combination strategy can further expand the functional boundaries of the measurement instrument and realize higher-level measurement tasks. For example, image information from different angles can be captured simultaneously by the dual measurement heads and combined with software algorithms for 3D reconstruction and precise analysis to obtain more comprehensive and accurate measurement results.
Versatile measurements for multiple needs
With the addition of dual measuring heads, the In-Line Image Gauge is capable of performing many types of measurement operations. These include, but are not limited to, line-to-line distance measurement, which is one of the fundamental means of evaluating the dimensional accuracy of a workpiece; and measurement of complex geometric features, such as the diameter of a merged circle, through the cooperative work of the dual measuring heads. These diverse measurement functions make the instrument an indispensable measurement tool in industrial production, and it is widely used in many fields such as automotive manufacturing, aerospace, and precision machinery.
Product recommendation
TECHNICAL SOLUTION
MORE+You may also be interested in the following information
FREE CONSULTING SERVICE
Let’s help you to find the right solution for your project!


 ASK POMEAS
  PRICE INQUIRY
  REQUEST DEMO/TEST
  FREE TRIAL UNIT
  ACCURATE SELECTION
  ADDRESS
 Tel:+ 86-0769-2266 0867
 Fax:+ 86-0769-2266 0867
 E-mail:marketing@pomeas.com
