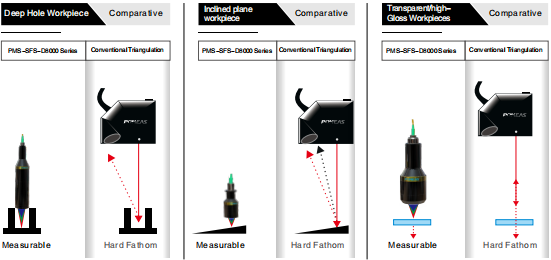
Characteristics of point-spectrum confocal sensors:

1, high-precision measurement: point spectral confocal sensors use the confocal principle of spectral dispersion, by calculating the wavelength of the reflected light to obtain the precise distance from the focal point of the measured object to the lens, so as to achieve high-precision measurement. Its measurement accuracy is usually up to the nanometre level, much higher than the traditional measurement methods.
2, non-contact measurement: the sensor adopts non-contact measurement mode, avoiding the measurement error and object damage caused by contact, especially suitable for the measurement of soft, easy to deform or high precision requirements of the object.
3, material adaptability: point spectrum confocal sensor in the measurement process will not be affected by the intensity of the reflected light, so it can be stable measurement of metal, ceramics, mirrors, glass, film and other materials of the object, the measured object surface colour and finish are no special requirements.
4, fast measurement speed: the sensor has a super-high scanning speed and response speed, can complete a large number of measurement tasks in a short period of time to improve the measurement efficiency.
Functional description of the Point Spectrum Confocal Sensor:

1、3D imaging: point spectral confocal sensors can obtain the whole or part of the surface of the object to be measured 3D imaging information, for the object shape, size and other parameters of the measurement to provide intuitive data support.
2、Displacement Measurement: The sensor can accurately measure the displacement of the measured object in a certain direction, providing accurate data for dynamic monitoring and position adjustment of the object.
3、Surface Quality Inspection: By measuring the small changes on the surface of the object, the sensor is able to assess the surface quality of the object, such as roughness, scratches, etc., providing an important basis for quality control.
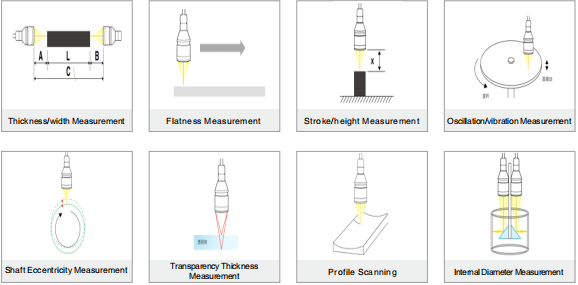
4、Thickness / width measurement: can accurately measure the thickness and width of the measured object.
5、Flatness Measurement Detection: The flatness of the measured object to ensure that the product meets the quality standards.
6、Stroke / data height measurement: measuring the stroke and height of the measured object, to provide support for product design and manufacturing.
7、Oscillation / vibration measurement: detect the oscillation and vibration of the measured object, to assess the stability and performance of the product.
8、Shaft Eccentricity Measurement: Measure the degree of eccentricity of the shaft centre to ensure the correct position of the shaft centre.
9、Transparency thickness measurement: able to measure the thickness of transparent objects, not affected by light refraction and other factors.
10、Surface Profile Scanning: Scanning the surface of the object to be measured to obtain its surface profile information.
11、Inner diameter measurement: Measure the inner diameter of the measured object to ensure that the product meets the design requirements.
Uses of Spot Spectral Confocal Sensors:

Industrial Manufacturing: Used in industrial automation production for rapid scanning of product contours, detecting product dimensions, orientation, step heights, gaps and face differences, material thickness and material surface features, etc., providing important support for the development of industrial automation.
Electronics Manufacturing: Used for dimensional measurement of tiny components, such as printed circuit boards, semiconductor chips, etc., to ensure that the product meets strict quality standards.
Optical component manufacturing: used for thickness and curvature measurement of various transparent lenses to ensure the quality and performance of optical components.
Automotive manufacturing: for dimensional measurement and surface topography inspection of engine components to ensure engine performance and quality.
Medical field: Used in the manufacture and inspection of medical devices to ensure the safety and effectiveness of medical devices by scanning the depth and shape of embossed and recessed 3D patterns, as well as precision embossing and micromachining to deal with the burr height of medical device parts.
Product recommendation
TECHNICAL SOLUTION
MORE+You may also be interested in the following information
FREE CONSULTING SERVICE
Let’s help you to find the right solution for your project!


 ASK POMEAS
  PRICE INQUIRY
  REQUEST DEMO/TEST
  FREE TRIAL UNIT
  ACCURATE SELECTION
  ADDRESS
 Tel:+ 86-0769-2266 0867
 Fax:+ 86-0769-2266 0867
 E-mail:marketing@pomeas.com
