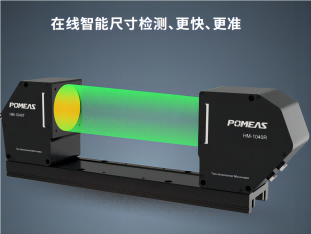
Comparison between in-line image measuring instrument and traditional measuring instrument
With the progress of science and technology, the measurement technology is also constantly innovating. As an emerging technology, on-line image measuring instrument is significantly different from traditional measuring instrument in terms of measurement method, structure and application. The following is a detailed comparison of the two:


Measurement Methods
Online Image Measuring Instrument:
① Non-contact measurement: The online image measuring instrument adopts the non-contact projection imaging principle, combined with high-precision image analysis algorithm, which can realize the accurate measurement of various parts. This type of measurement avoids errors caused by contact and improves the accuracy and stability of measurement.
② Automated Measurement: Through the automation function and image processing technology, the online image measuring instrument is able to quickly capture the contour map of the product, compare it with the tiny pixel points to calculate the product size, and complete the evaluation of dimensional tolerances at the same time. This automated measurement greatly improves the measurement efficiency.
Traditional Measuring Instruments:
① Contact measurement: Traditional measuring instruments such as vernier calipers, micrometers, etc. usually use contact measurement to obtain dimensional information through direct contact between the measuring tool and the object to be measured. This type of measurement may be physically limited when dealing with small or complex components, affecting the measurement accuracy.
② Manual operation: Traditional measuring instruments usually require more manual operation and time, such as adjusting the measuring tool and reading the measurement data. This manual operation method is not only inefficient, but may also lead to measurement errors due to human factors.
Product Structure
In-line image measuring instrument:
Complex structure: online image measuring instrument usually consists of high-precision cameras, lenses, light sources, altimetry sensors and image analysis software and other components. These components cooperate with each other to realize the accurate measurement of the object.
Integrated design: Online image measuring instrument usually adopts integrated design, which compactly installs each component together to form a whole system. This design not only improves the stability and reliability of the system, but also facilitates portability and installation.
Conventional Gauges:
Simple structure: the structure of traditional gauges is relatively simple, usually consisting of the measuring tool itself and the reading device. This simplicity makes traditional gauges easy to use and maintain.
Decentralized design: The components of a conventional gauge are usually scattered and need to be assembled and adjusted manually. This decentralized design can lead to errors and inconvenience during the measurement process.
Applications
In-line image measuring instrument:
Wide range of applications: In-line image measuring instrument is suitable for a wider range of applications, including machinery, electronics, molds, injection molding, hardware, rubber and many other industries. It is especially suitable for measuring tiny components, complex curved parts and other scenarios where high precision is required.
Efficient production: The in-line image measuring instrument can be integrated into the production process for real-time monitoring and measurement of products in the production process to ensure the consistency and stability of product quality. This efficient production method is important for improving production efficiency and reducing scrap rate.
Traditional measuring instruments:
Limited applications: Conventional gauges may be more practical in the measurement of certain simple or large components. However, when dealing with tiny or complex components, conventional gauges may be physically limited, compromising measurement accuracy and efficiency.
Manual Inspection: Conventional gauges often require manual operation and readings, making them inadequate in scenarios that require fast, high-volume inspection. In addition, manual inspection can lead to measurement errors and inconsistencies due to human factors.
Product recommendation
TECHNICAL SOLUTION
MORE+You may also be interested in the following information
FREE CONSULTING SERVICE
Let’s help you to find the right solution for your project!


 ASK POMEAS
  PRICE INQUIRY
  REQUEST DEMO/TEST
  FREE TRIAL UNIT
  ACCURATE SELECTION
  ADDRESS
 Tel:+ 86-0769-2266 0867
 Fax:+ 86-0769-2266 0867
 E-mail:marketing@pomeas.com
